Protect your Cloudflare project with Appwarden
To secure your domain against an in-progress attack, add the Appwarden middleware to your Cloudflare project. When you issue the /quarantine lock command from Discord, Appwarden will quarantine your website and redirect users to your lock page.
Appwarden supports any orange clouded website on Cloudflare. This guide helps you choose the right integration approach for your project.
Appwarden middleware runs on every request to your website and may incur additional usage-based charges. Cloudflare has an affordable pricing model, but be sure to review it before proceeding.
The universal middleware is the recommended approach for all Cloudflare deployments. It deploys as a single Cloudflare Worker with no code changes required to your application.
The universal middleware works with all Cloudflare projects. This deployment strategy:
- Seamlessly synchronizes with Appwarden configuration — Appwarden configuration is synchronized with your domain configuration repository, so all Appwarden configuration is managed in a single place.
- Active security patching — Always deploys the latest security patches and updates.
- Pick your deployment strategy — Deploy Appwarden at application build time or on demand.
Learn how to install the Appwarden universal middleware on Cloudflare.
Only use a framework-specific adapter if the universal middleware is not compatible with your project. The universal middleware is the recommended approach unless your architecture prevents you from using it.
If the universal middleware is not compatible with your project, you can use a framework-specific adapter that integrates Appwarden into your framework’s middleware system.
This approach:
- Runs as middleware in your application — Appwarden runs as part of your application framework
- Single deployment — deploy Appwarden together with your application
Some frameworks may not be compatible with all of the features offered by the universal middleware. Check the framework-specific guide for more information.
See the framework-specific guides:
- Astro on Cloudflare Workers
- React Router on Cloudflare Workers
- TanStack Start on Cloudflare Workers
- Next.js on Cloudflare Workers
This section covers deploying the universal Appwarden middleware. The universal middleware deploys as a Cloudflare Workers service that services requests to Appwarden-configured domains via Worker Routes.
The action automatically deploys the most up-to-date version of Appwarden to Cloudflare. Your middleware stays current with the latest security features and improvements.
Your middleware configuration is automatically applied from the domain configuration file. Simply manage your domain configuration and the action handles the rest.
This middleware fully supports Appwarden’s nonce-based Content Security Policy (CSP) functionality, enabling robust protection against browser-based attacks while maintaining compatibility with your application.
The action builds a single Cloudflare Worker script that runs on every request to
the hostnames listed in the middleware section of your domain configuration
files.
For example, given this domain configuration:
hostname: appwarden.ccversion: 1websites: middleware: - url: appwarden.cc options: lock-page-slug: /maintenance csp-mode: report-only csp-directives: script-src: - "self" - "{{nonce}}" - url: tanstack.appwarden.cc options: lock-page-slug: /maintenance csp-mode: enforced csp-directives: img-src: - "self"The deployed Cloudflare Workers service will include a route for each configured hostname:
Before proceeding, ensure you have:
- A domain proxied through Cloudflare (orange-clouded)
- A GitHub project repository or domain configuration repository
- Your Appwarden API token
- Your Cloudflare Account ID and API token
We recommend deploying Appwarden middleware via GitHub Actions to have fine-grained control over your deployment strategy. The deployment workflow template is available in the domain configuration repository.
Choose whether to deploy Appwarden from your domain configuration repository (e.g. when you update your domain configuration) or your project repository (e.g. when you release a new version of your project).
You may combine your domain configuration repository into your project
repository to manage your Appwarden configuration and project together by
adding a .appwarden directory to your project repository and updating your
Settings > GitHub > Domain Configuration
Repository in the
Appwarden dashboard.
In the chosen repository, create a GitHub Actions workflow file at .github/workflows/deploy-appwarden-middleware.yml with the content below.
Follow the emoji action item instructions (e.g. 1️⃣) in the workflow file above:
- To set
CLOUDFLARE_ACCOUNT_ID, navigate to Cloudflare Dashboard > Your Account > Workers and copy the Account ID from the sidebar - To set
APPWARDEN_API_TOKEN, refer to the API token management guide - To set
CLOUDFLARE_API_TOKEN, create an API token in your Cloudflare dashboard with Worker permissions
- Push the modified workflow file to your repository
- In your repository Actions tab, run the workflow using the workflow_dispatch trigger and ensure the workflow runs successfully
- If the job failed, inspect the logs to identify the issue. Feel free to reach out in our community for assistance
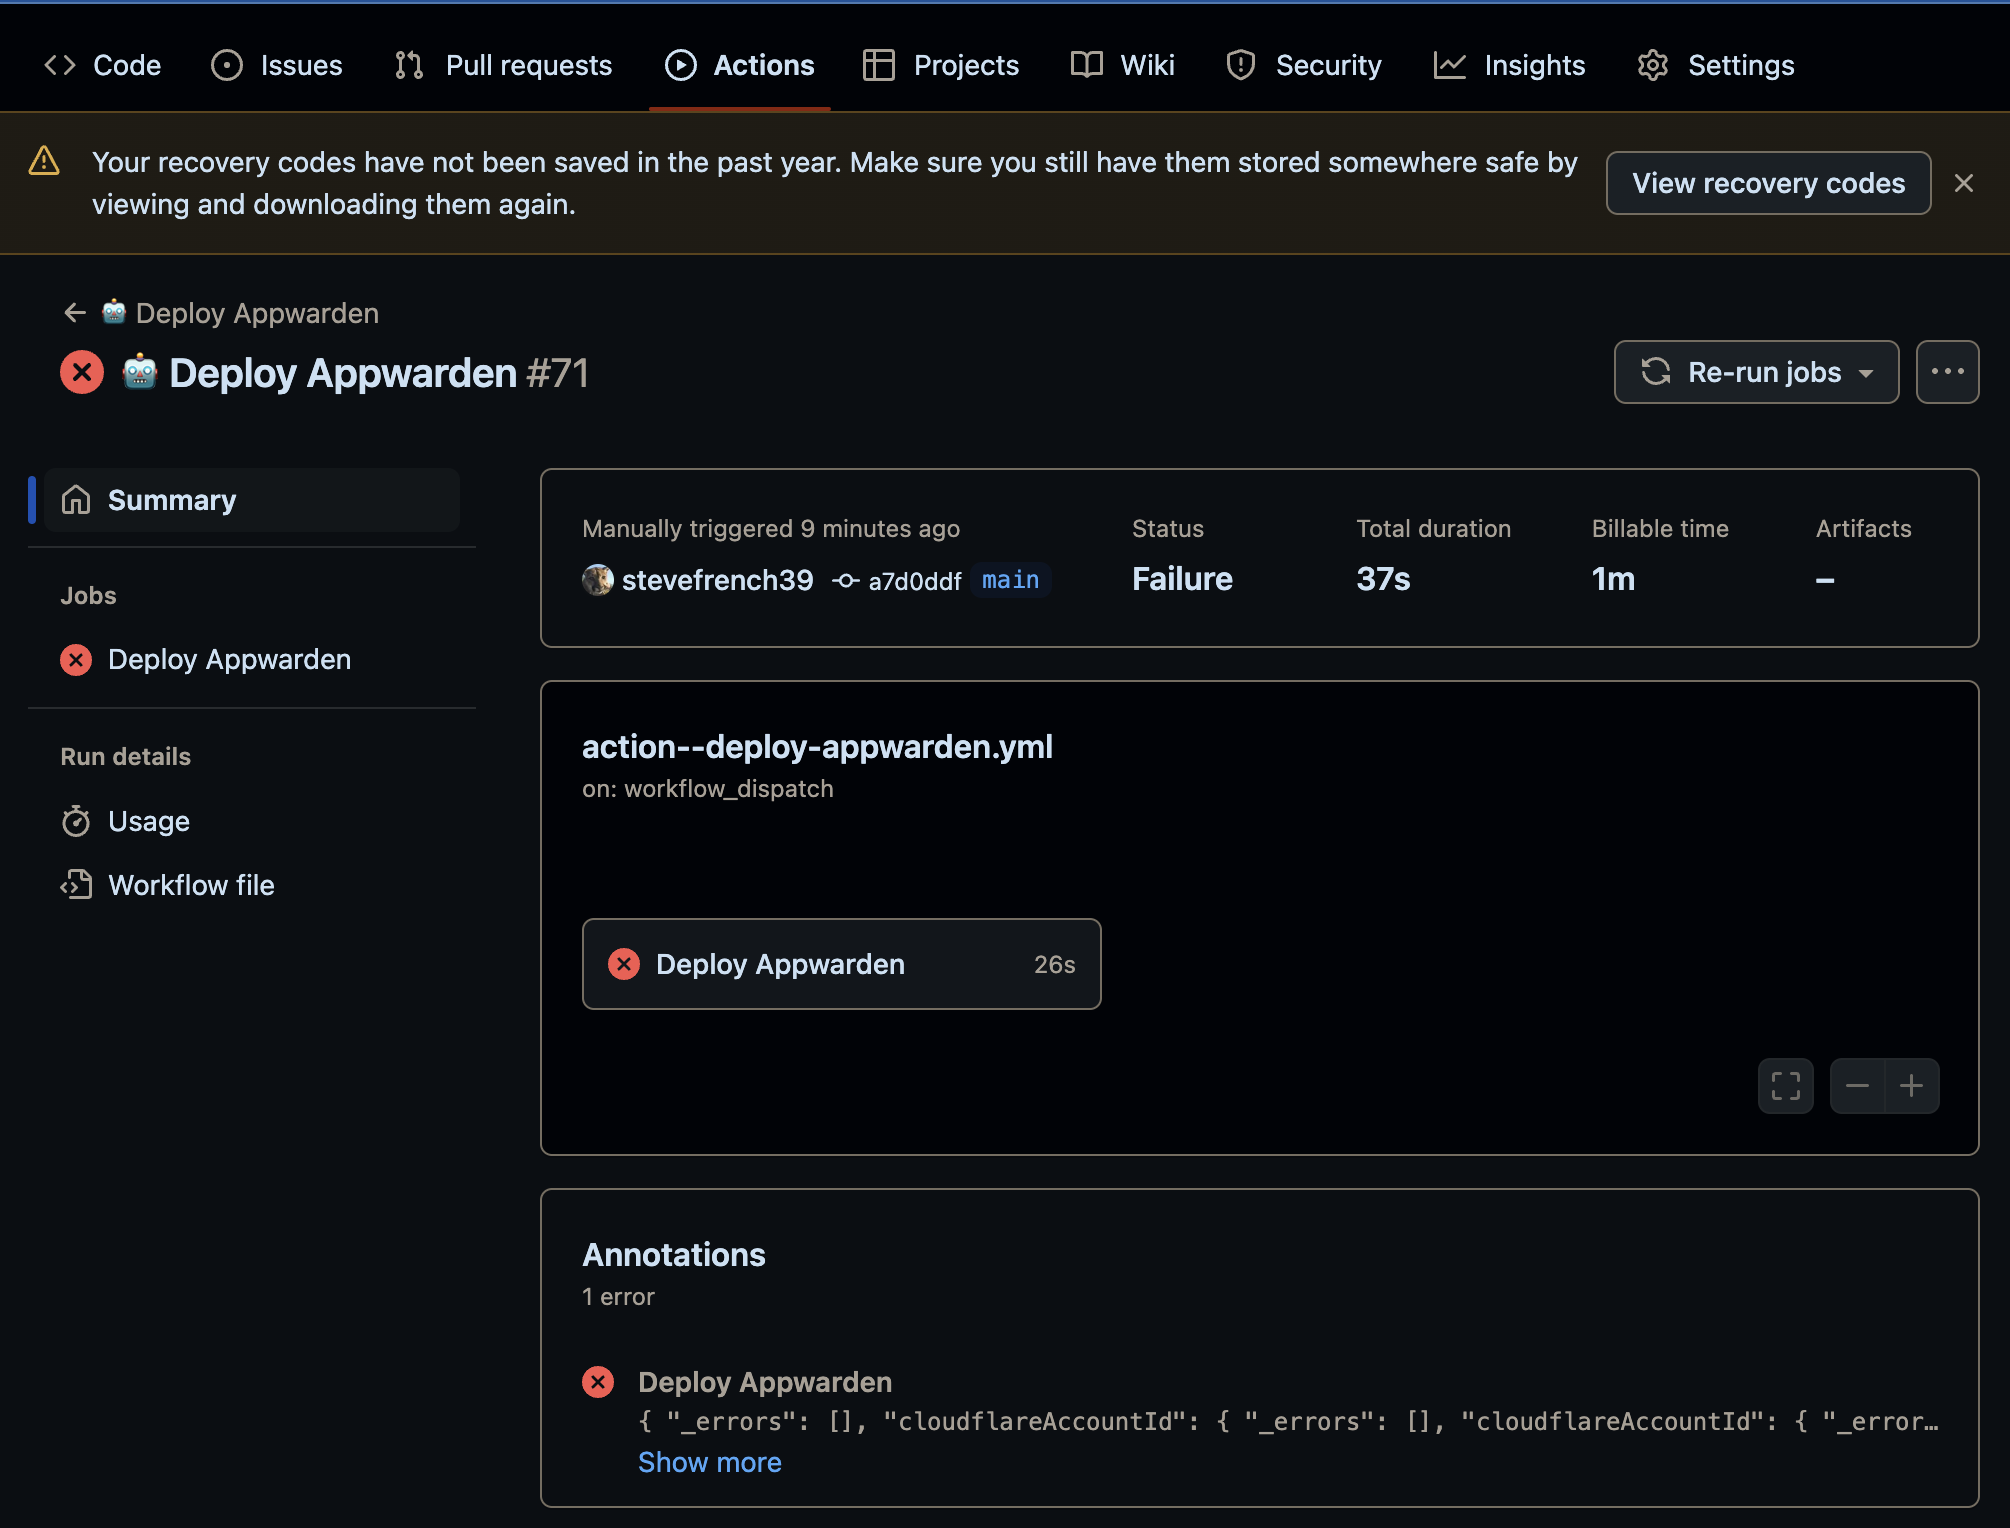
- If you enabled a on push or on release trigger in 1️⃣ above, push a change to the target branch or create a release to ensure the workflow succeeds
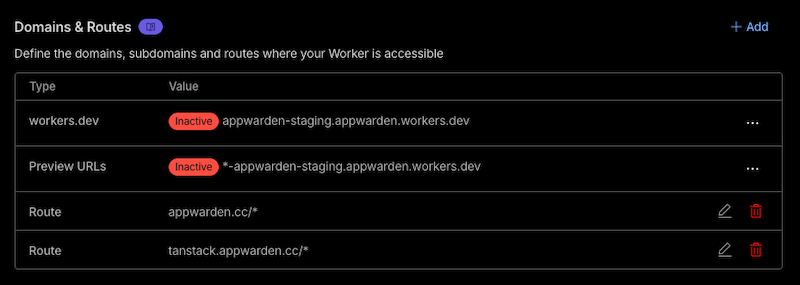
- Ensure the middleware is deployed by navigating to Cloudflare Dashboard > Your Account > Your Domain > Worker Routes and checking the
appwarden-productionscript is associated with the *your.app/* route
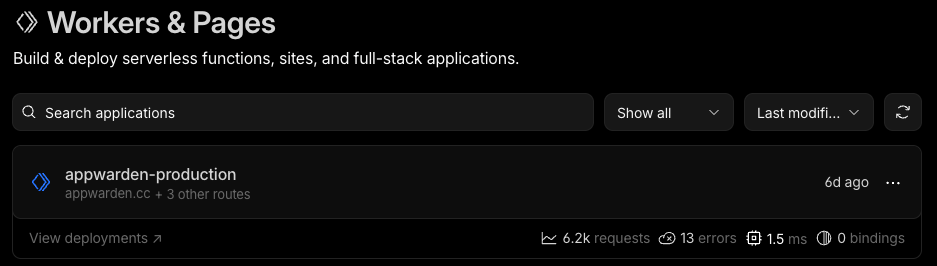
After deploying your project, navigate to your Cloudflare Dashboard > Workers & Pages > appwarden-production > Logs for error messages from @appwarden/middleware after refreshing the website repeatedly. Inspect any errors and adjust your environment before redeploying your project until all errors are resolved.
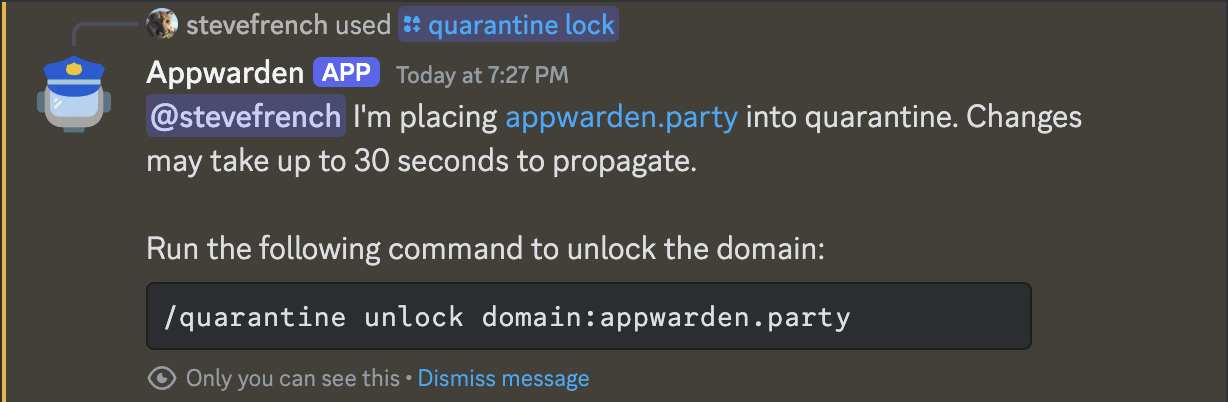
Once any errors are resolved, issue the /quarantine test command in Discord. Then, navigate to your.app/_appwarden/test in your browser. If the lock page appears (may take up to 30 seconds), Appwarden is correctly installed in your web project. You may re-issue the test command to unlock your test page.
Congratulations — Appwarden is protecting your domain! In the event of a security breach, you
can now issue the /quarantine lock command in Discord to
quarantine your website within seconds, protecting your
users while the problem is resolved.
Only use a framework-specific adapter if the universal middleware is not compatible with your project. The universal middleware is the recommended approach unless your architecture prevents you from using it.
If the universal middleware is not compatible with your project, you can use a framework-specific adapter that integrates Appwarden into your framework’s middleware system. The following sections provide detailed integration guides for each supported framework.
This section covers integrating Appwarden with Astro projects deployed to Cloudflare Workers. Appwarden integrates as native Astro middleware by running before your routes to protect your site.
This guide applies to server-rendered (SSR) Astro projects using the @astrojs/cloudflare
adapter. For static Astro sites, see the Universal Middleware section.
Before proceeding, ensure you have:
- An Astro project with SSR enabled (
output: "server"oroutput: "hybrid") - The
@astrojs/cloudflareadapter installed and configured - Your Appwarden API token
Install the Appwarden middleware package:
npm install @appwarden/middleware# orpnpm add @appwarden/middleware# oryarn add @appwarden/middlewareCreate (or update) your Astro middleware file at src/middleware.ts:
import { sequence } from "astro:middleware"import { createAppwardenMiddleware } from "@appwarden/middleware/cloudflare/astro"
const appwarden = createAppwardenMiddleware((cloudflare) => ({ lockPageSlug: cloudflare.env.APPWARDEN_LOCK_PAGE_SLUG, appwardenApiToken: cloudflare.env.APPWARDEN_API_TOKEN, debug: cloudflare.env.DEBUG, contentSecurityPolicy: { // See [Configuration > contentSecurityPolicy](https://appwarden.io/docs/reference/appwarden-middleware#contentsecuritypolicy) section for details },}))
export const onRequest = sequence(appwarden)The cloudflare parameter provides access to Cloudflare’s environment via cloudflare.env and
execution context via cloudflare.ctx. This is the same runtime available in
context.locals.runtime in your Astro pages.
Create a page that will be shown when your site is quarantined:
---// This page is shown when your site is quarantined---<html lang="en"> <head> <meta charset="utf-8" /> <meta name="viewport" content="width=device-width" /> <title>Site Under Maintenance</title> </head> <body> <main> <h1>Site Under Maintenance</h1> <p>We're performing scheduled maintenance. Please check back soon.</p> </main> </body></html>Ensure your astro.config.mjs is configured for Cloudflare:
import { defineConfig } from "astro/config"import cloudflare from "@astrojs/cloudflare"
export default defineConfig({ output: "server", adapter: cloudflare(),})Create a .dev.vars file for local development:
APPWARDEN_API_TOKEN=your-api-token-hereAPPWARDEN_LOCK_PAGE_SLUG=/maintenanceFor production, set APPWARDEN_LOCK_PAGE_SLUG in your wrangler.toml and APPWARDEN_API_TOKEN via wrangler secret:
wrangler secret put APPWARDEN_API_TOKENTest locally with the Astro dev server:
npm run devThe Astro dev server with the Cloudflare adapter provides access to Cloudflare bindings via
wrangler. Ensure you have a wrangler.jsonc or wrangler.toml file in your project root.
Deploy your project to Cloudflare:
wrangler deployAfter deploying, navigate to your Cloudflare Dashboard > Workers & Pages > your-project > Logs to check for any error messages from @appwarden/middleware.
Once any errors are resolved, issue the /quarantine test command in Discord. Then, navigate to your.app/_appwarden/test in your browser. If the lock page appears (may take up to 30 seconds), Appwarden is correctly installed.
Congratulations — Appwarden is protecting your Astro site! In the event of a security breach,
you can now issue the /quarantine lock command in Discord to
quarantine your website within seconds.
This section covers integrating Appwarden with React Router v7 (formerly Remix) projects deployed to Cloudflare Workers. Appwarden integrates as native React Router middleware, running before your loaders and actions to protect your site.
Before proceeding, ensure you have:
- A React Router v7 project configured for Cloudflare Workers
- React Router’s middleware feature enabled (see React Router middleware docs)
- Your Appwarden API token
Install the Appwarden middleware package:
npm install @appwarden/middleware# orpnpm install @appwarden/middleware# oryarn add @appwarden/middlewareReact Router’s middleware feature requires the v8_middleware future flag. Add this to your react-router.config.ts:
import type { Config } from "@react-router/dev/config"
export default { ssr: true, future: { v8_middleware: true, },} satisfies ConfigWithout the v8_middleware flag, React Router will silently ignore your middleware exports and
Appwarden will not run.
Add Appwarden middleware to your root route file (app/root.tsx). React Router middleware executes hierarchically from parent to child, so middleware on the root route automatically runs for every nested route in your application:
import { env } from "cloudflare:workers"import { createAppwardenMiddleware } from "@appwarden/middleware/cloudflare/react-router"
export const middleware = [ createAppwardenMiddleware(() => ({ lockPageSlug: env.APPWARDEN_LOCK_PAGE_SLUG, appwardenApiToken: env.APPWARDEN_API_TOKEN, // "debug" can be a string or boolean; the schema will normalize it debug: env.DEBUG, // "directives" can be a JSON string or an object; the schema will parse it contentSecurityPolicy: { // See [Configuration > contentSecurityPolicy](https://appwarden.io/docs/reference/appwarden-middleware#contentsecuritypolicy) section for details }, })),]Create a maintenance page that will be shown when your site is locked:
export default function MaintenancePage() { return ( <div className="flex min-h-screen items-center justify-center"> <div className="text-center"> <h1 className="text-4xl font-bold">Site Under Maintenance</h1> <p className="mt-4 text-gray-600"> We're performing scheduled maintenance. Please check back soon. </p> </div> </div> )}Create a .dev.vars file for local development:
APPWARDEN_API_TOKEN=your-api-token-hereAPPWARDEN_LOCK_PAGE_SLUG=/maintenanceFor production, set APPWARDEN_LOCK_PAGE_SLUG in your wrangler.toml and APPWARDEN_API_TOKEN via wrangler secret:
wrangler secret put APPWARDEN_API_TOKENYour worker entry file should pass the Cloudflare context to React Router. This is typically already configured if you’re using the Cloudflare template:
import { createRequestHandler } from "react-router"
const requestHandler = createRequestHandler( () => import("virtual:react-router/server-build"), import.meta.env.MODE,)
export default { async fetch(request, env, ctx) { return requestHandler(request, { cloudflare: { env, ctx }, }) },} satisfies ExportedHandler<Env>Deploy your project to Cloudflare:
wrangler deployAfter deploying, navigate to your Cloudflare Dashboard > Workers & Pages > your-project > Logs to check for any error messages from @appwarden/middleware.
Once any errors are resolved, issue the /quarantine test command in Discord. Then, navigate to your.app/_appwarden/test in your browser. If the lock page appears (may take up to 30 seconds), Appwarden is correctly installed.
Congratulations — Appwarden is protecting your React Router site! In the event of a security
breach, you can now issue the /quarantine lock command in Discord to
quarantine your website within seconds.
This section covers integrating Appwarden with TanStack Start projects deployed to Cloudflare Workers. Appwarden integrates as global request middleware, running before every request to protect your site.
This guide applies to TanStack Start projects. For other websites, see the Universal Middleware section.
Before proceeding, ensure you have:
- A TanStack Start project configured for Cloudflare Workers
- Your Appwarden API token
Install the Appwarden middleware package:
npm install @appwarden/middleware# orpnpm add @appwarden/middleware# oryarn add @appwarden/middlewareCreate (or update) your src/start.ts file to configure global request middleware:
import { createMiddleware } from "@tanstack/start"import { env } from "cloudflare:workers"import { createAppwardenMiddleware } from "@appwarden/middleware/cloudflare/tanstack-start"
const appwardenMiddleware = createMiddleware().server( createAppwardenMiddleware(() => ({ lockPageSlug: env.APPWARDEN_LOCK_PAGE_SLUG, appwardenApiToken: env.APPWARDEN_API_TOKEN, debug: env.DEBUG, // Accepts string or boolean contentSecurityPolicy: { // See [Configuration > contentSecurityPolicy](https://appwarden.io/docs/reference/appwarden-middleware#contentsecuritypolicy) section for details }, })),)
export const startInstance = createStart(() => ({ requestMiddleware: [appwardenMiddleware],}))Create a maintenance page that will be shown when your site is locked:
import { createFileRoute } from "@tanstack/react-router"
export const Route = createFileRoute("/maintenance")({ component: MaintenancePage,})
function MaintenancePage() { return ( <div className="flex min-h-screen items-center justify-center"> <div className="text-center"> <h1 className="text-4xl font-bold">Site Under Maintenance</h1> <p className="mt-4 text-gray-600"> We're performing scheduled maintenance. Please check back soon. </p> </div> </div> )}Create a .dev.vars file for local development:
APPWARDEN_API_TOKEN=your-api-token-hereAPPWARDEN_LOCK_PAGE_SLUG=/maintenanceFor production, set APPWARDEN_LOCK_PAGE_SLUG in your wrangler.toml and APPWARDEN_API_TOKEN via wrangler secret:
wrangler secret put APPWARDEN_API_TOKENDeploy your project to Cloudflare:
wrangler deployAfter deploying, navigate to your Cloudflare Dashboard > Workers & Pages > your-project > Logs to check for any error messages from @appwarden/middleware.
Once any errors are resolved, issue the /quarantine test command in Discord. Then, navigate to your.app/_appwarden/test in your browser. If the lock page appears (may take up to 30 seconds), Appwarden is correctly installed.
Congratulations — Appwarden is protecting your TanStack Start site! In the event of a security
breach, you can now issue the /quarantine lock command in Discord to
quarantine your website within seconds.
This section covers integrating Appwarden with Next.js projects deployed to Cloudflare Workers using OpenNext. Appwarden integrates as native Next.js middleware by running before your routes to protect your site.
For Next.js on Vercel, see the Vercel integration guide which uses a simpler middleware approach.
Before proceeding, ensure you have:
- A Next.js project (App Router or Pages Router)
- The
@opennextjs/cloudflareadapter installed and configured - Your Appwarden API token
Install the Appwarden middleware package:
npm install @appwarden/middleware# orpnpm add @appwarden/middleware# oryarn add @appwarden/middlewareNext.js 16+ users: Next.js 16 renamed middleware.ts to proxy.ts. The middleware.ts
convention is deprecated in Next.js 16+. See the Next.js 16+ section below
for the updated filename.
Create (or update) your middleware file in your project root.
Create the file at middleware.ts:
import { createAppwardenMiddleware } from "@appwarden/middleware/cloudflare/nextjs"
export const config = { matcher: ["/((?!api|_next/static|_next/image|favicon.ico).*)"],}
export default createAppwardenMiddleware((cloudflare) => ({ lockPageSlug: cloudflare.env.APPWARDEN_LOCK_PAGE_SLUG, appwardenApiToken: cloudflare.env.APPWARDEN_API_TOKEN, debug: cloudflare.env.DEBUG, // Headers-only CSP (no HTML rewriting, no nonce support; do not use `{{nonce}}` here) contentSecurityPolicy: { // See [Configuration > contentSecurityPolicy](https://appwarden.io/docs/reference/appwarden-middleware#contentsecuritypolicy) section for details },}))In Next.js 16, middleware was renamed to “proxy”. Create the file at proxy.ts:
import { createAppwardenMiddleware } from "@appwarden/middleware/cloudflare/nextjs"
export const config = { matcher: ["/((?!api|_next/static|_next/image|favicon.ico).*)"],}
export default createAppwardenMiddleware((cloudflare) => ({ lockPageSlug: cloudflare.env.APPWARDEN_LOCK_PAGE_SLUG, appwardenApiToken: cloudflare.env.APPWARDEN_API_TOKEN, debug: cloudflare.env.DEBUG, // Headers-only CSP (no HTML rewriting, no nonce support; do not use `{{nonce}}` here) contentSecurityPolicy: { // See [Configuration > contentSecurityPolicy](https://appwarden.io/docs/reference/appwarden-middleware#contentsecuritypolicy) section for details },}))Create a maintenance page that will be shown when your site is locked:
export default function MaintenancePage() { return ( <div className="flex min-h-screen items-center justify-center"> <div className="text-center"> <h1 className="text-4xl font-bold">Site Under Maintenance</h1> <p className="mt-4 text-gray-600"> We're performing scheduled maintenance. Please check back soon. </p> </div> </div> )}Ensure your open-next.config.ts is properly configured:
import type { OpenNextConfig } from "@opennextjs/cloudflare"
export default { // Your OpenNext configuration} satisfies OpenNextConfigCreate a .dev.vars file for local development:
APPWARDEN_API_TOKEN=your-api-token-hereAPPWARDEN_LOCK_PAGE_SLUG=/maintenanceFor production, set APPWARDEN_LOCK_PAGE_SLUG in your wrangler.toml and APPWARDEN_API_TOKEN via wrangler secret:
wrangler secret put APPWARDEN_API_TOKENBuild your Next.js project with OpenNext and deploy:
# Deploy to Cloudflarewrangler deployAfter deploying, navigate to your Cloudflare Dashboard > Workers & Pages > your-project > Logs to check for any error messages from @appwarden/middleware.
Once any errors are resolved, issue the /quarantine test command in Discord. Then, navigate to your.app/_appwarden/test in your browser. If the lock page appears (may take up to 30 seconds), Appwarden is correctly installed.
Congratulations — Appwarden is protecting your Next.js site on Cloudflare! In the event of a
security breach, you can now issue the /quarantine lock command in Discord to
quarantine your website within seconds.
If you’re unsure which approach to use, here’s a quick summary:
| Deployment Type | Recommendation |
|---|---|
Cloudflare Pages (*.pages.dev) | Universal Middleware |
| Orange-clouded domain (external origin) | Universal Middleware |
Workers static assets (wrangler deploy) | Universal Middleware (recommended) or framework-specific adapter |
If you have any questions or need assistance, please don’t hesitate to reach out to us on Discord.